This is the second part of a multi-part series on creating your own static website for complete beginners. It will focus on setting up your development environment and the workflow for using github pages. By the end of this tutorial part, you will have a one page website hosted on Github pages for the world to see. I will also suggest resources for further developing your website. Again, everything used in this tutorial is free! All you need is a computer (Mac, Windows, or Linux) and an internet connection to get started. If you haven’t already, check out part one for why we are coding our own website.
Project Structure
Here is all of the technologies/frameworks this part of the tutorial will cover:
- bash
- git
- Github and Github Pages
Now, I will explain the purpose of each part on extremely basic terms. If you are already familiar with these terms, you can skip to the next section.
The tutorial is going to follow the order of the project structure listed above. However, I’m going to explain what each part is in reverse order, starting with github pages. This is because I’m writing these tutorials from a results-focused mindset. I’m assuming you don’t care about learning the ins and outs of these technologies for the sake of it, but care most about achieving the final result - a website you can use.
The goal is to have a static website viewable from any web browser. To do this, we need a hosting service. That is why we are using Github Pages. Github Pages is a hosting service offered by Github where files you upload to their servers can easily be served as websites. This service is free and we are even currently using it to host this site. In order to get our files on Github, we need to use git to upload them. Git is a version control software where you can track changes to every file in a project. It is really convenient for projects with many files, working with others on the same project, or if you are like me and get confused easily.
When using git, a project folder that you are tracking with git is called a repository. Github is a hosting service website that provides hosting for git repositories. You can think of it as the Google Drive for git repositories. Basically, use git to track your local file changes, then upload the files to Github so they can be accessed through the internet, then set up Github Pages so those files can be viewed as a webpage.
There are many ways to use git. This tutorial will cover using it through the bash shell. A shell is a program that interprets text commands and executes them. If you heard the term “command line” before, it is referring to the commands entered to be interpreted by a shell. Bash is a shell that is installed on many UNIX and UNIX-like systems such as MacOS and Ubuntu (operating systems used in this tutorial).
There is a learning curve for modern computer/smartphone users, but I still recommend learning this because of the amount of documentation available online for bash users. Although there are many softwares available for using git, I think using git through bash is the most common way of using git. It also works well with creating a local host to test your site locally and installing other frameworks if you want to continue to learn more and expand your website. For example, later we will be using bash to install and run jekyll (more on that in the next part).
I also wanted to make this tutorial useful for both Windows and MacOS users. Instead of making a separate parallel tutorial with different commands and clients for Windows users, I decided to concentrate on getting everyone to a UNIX or UNIX-like operating system and using bash. That said, the next part differs depending on if you are using MacOS or Windows. So skip to the sections for the operation system you are using.
Setting up bash and git
MacOS: Setting up bash
If you are using any MacOS before MacOS Catalina, bash should be the default shell on your computer. You can check what OS you are running by clicking the Apple logo on the top left of your screen and then “About this Mac”. If you are using Catalina, the default shell used by Terminal is zsh, but you can easily switch to bash.
Search for “Terminal” in your Applications and open it.
You should see something like this:
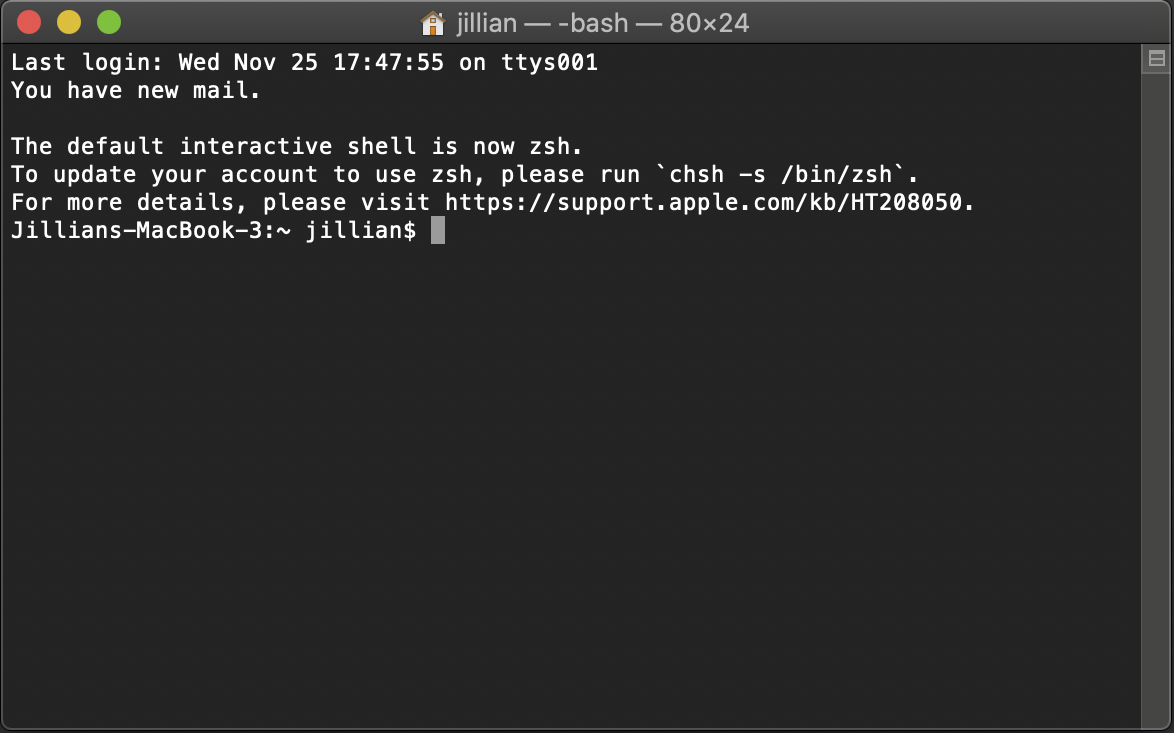
The rectangle on the last line of text is the cursor. When you type commands, the text should appear in front of it. To run a command, press the enter key on your keyboard.
If it does not say “bash” at the top of the window and says “zsh” instead, type run this command to change the default shell to bash:
chsh -s /bin/bash
After running that command, it will prompt you for your system password (the password you use to login to your Mac). Type your password and press enter. Text characters will not appear on your screen when entering your password. Then, close the Terminal window and open it again. You should now be running the bash shell. Check that it says “bash” at the top of the Terminal window like the image above.
Source: “How to Change the Default Shell to Bash in MacOS Catalina” from howtogeek.com
We will be using this terminal window to run all our commands from now on. You can also install other terminal applications that include more features. I use iterm2 instead of the Terminal application. I recommend using it but it’s completely optional!
MacOS: Setting up git
Now, it’s time to set up git. Check to see if you already have git installed by running this command in Terminal.
git version
If it outputs “git version” and a version number, then you already have git installed and you can skip to the next section. If the git command is not recognized, we are going to install it through Homebrew, a package manager for MacOS.
To install Homebrew, you need to have Apple’s XCode command line tools installed.
xcode-select --install
After running that command, there should be a popup window that guides you through the installation process for XCode command line tools. Then, install Homebrew with the following command.
/bin/bash -c "$(curl -fsSL https://raw.githubusercontent.com/Homebrew/install/HEAD/install.sh)"
Follow the command line prompts to finish the installation. Then, run this command to install git through Homebrew:
brew install git
Source: Homebrew documentation
Source: Github git guide
After the installation is complete, use git version to make sure it has been installed. It should output the text “git version” and a version number. Now you should be ready to use git and Github!
Skip to the section called “Basic git and Github”.
Windows: Setting up bash
If you are using a Windows operating system, it’s a bit more complicated to set up bash. We are going to use a feature called “Windows Subsystem for Linux” that allows us to run Linux programs on Windows 10. Then, we will install Ubuntu, a Linux operating system, which includes the bash shell. This solution only works for Windows 10 64-bit. If you are using Windows 7, you can upgrade to Windows 10 for free or try using a client like git for Windows.
Search “Control Panel” in the Start Menu and open it. Go to “Programs” and then “Turn Windows Features On Or Off”. In the “Windows Features” window, check the box next to “Windows Subsystem for Linux” and click “OK”.
Wait for the files to install and restart your computer when prompted.
After your computer boots up again, go to the Microsoft Store. Here you can install different Linux distributions. For this tutorial we are using Ubuntu.
Click “Get” to install the program. After installation, search “Ubuntu” in the Start Menu and open the program. The first time you open this program, it will run some installations. Wait a bit and it will prompt you to create a UNIX username and password. This is specific to your Ubuntu installation and isn’t related to your Windows username and password. Press enter after typing to submit your username and password.
After following the prompts, you should see something like this:
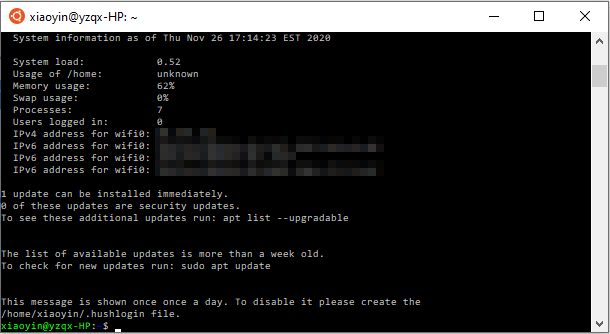
We will be using this terminal window to run all our commands from now on. The blinking rectangle on the last line of text is the cursor. When you type commands, the text should appear in front of it. To run a command, press the enter key on your keyboard.
Source: “How to Install and Use the Linux Bash Shell on Windows 10” from howtogeek.com
Source: Ubuntu Windows 10 Tutorial
Windows: Setting up git
Git is included with the Ubuntu distribution. Run the command git version to verify that it has been installed. It should output the text “git version” and a version number.
Remember that this Ubuntu distribution is running as a subsystem on your Windows system. Use the command pwd to find out what directory you are in.
You probably do not recognize this file location because it is inside the newly created filesystem for your Ubuntu distribution.
Use the command cd .. to move to the directory that is the parent of the current directory. cd foldername will move you to that folder (where foldername is the name of a folder). .. means the parent of the current directory.
Use cd .. again to move up one more level.
Then use the command ls to list all the files in the current directory.
You should now see a folder called /mnt. This folder contains your Windows filesystem.
Use cd /mnt to move to it. You should now see folders for the familiar drives that hold all your files.

If you want to edit your files outside of the Ubuntu terminal, make sure your files are saved in your Windows filesystem (within the folders in the /mnt folder). It is not recommended to edit any of the files in the Ubuntu distribution filesystem with any Windows software. Later you will probably be editing files with Windows software installed on your computer such an image editing software or a text editor, so it’s best to keep your website files in the Windows filesystem.
Source: “How to Access Your Ubuntu Bash Files in Windows” from howtogeek.com
Our goal is to use Github and upload and download files from it easily; however by default when using Windows Subsystems for Linux, we cannot make changes to a folder within the /mnt folder from within the Ubuntu terminal because of file permissions. To solve this issue, we are going to run the following two commands. Note that if you have multiple drives, make sure to replace the c with the letter of the drive folder you are using. After running the first command, you may be prompted to enter the UNIX account password you just created.
sudo umount /mnt/c
sudo mount -t drvfs C: /mnt/c -o metadata
For example, I’m using my D drive so I ran:
sudo umount /mnt/d
sudo mount -t drvfs D: /mnt/d -o metadata
Source: “How to solve ‘Operation not permitted’ on cloning repository” from askubuntu.com
Source: Chmod/Chown WSL Improvements
Now you should be ready to use git and Github!
Basic git and Github
As mentioned in the first section, git is a version control software for tracking changes to files. Github is a hosting service website where you can upload your git repositories. Now, we are going to be creating our first git repository on our local filesystem, creating a repository on Github, connecting the two repositories, then uploading our first files to Github.
From now on, I will refer to the git repository (repo for short) on your local filesystem as local and the repository hosted on github.com as remote. It’s important to keep track of the difference between the two because your changes won’t reflect across them automatically. Think of it as files on your computer vs. files on Google Drive. If you edit a photo on your computer, the latest version won’t be on Google Drive unless you upload it yourself. If your friend uploads a new photo to a shared Google Drive folder, you won’t have it on your computer unless you download it first.
Creating a Github account
First, you need a Github account. In a web browser, go to github.com and sign up for an account. Keep in mind that your username may be important to your final Github Pages site. Unless you are using a custom domain name, the url of your site will be “yourgithubusername.github.io” where “yourgithubusername” is your Github username. However, you can purchase a domain name at any time and connect it to your Github Pages site so it’s not a huge deal. Go to jirrian.github.io for an example.
Setting your git identity
To start saving our changes with git, we need to set a username and email. From within your terminal window, run the following command to set a username for git (replace yourgitusername with your name or username of choice). This is not the same thing as your Github username and it does not have to be the same.
git config --global user.name "yourgitusername"
Then, add your email with the following command (replace youremailaddress@example.com with your email address).
git config --global user.email youremailaddress@example.com
This user information is used in every git commit (more on commits later). The --global flag sets this user information for all git repositories on your machine.
Source: Setting your username in Git
Creating a local git repository
Now we need to create a local folder where our website files will be saved. From within the terminal window, navigate to a folder in your file system that you typically save documents in, such as the “Documents” folder.
How to navigate through your filesystem in the terminal
Use the pwd command to see what folder you are currently in.
Use the cd foldername command to move into a folder (replace foldername with the name of a folder).
Use cd .. to move to the parent of the current folder. There is a lot more to using cd, see the top solution on this page to read more about specifying absolute or relative paths for folder names.
Use the ls command to list every file in the folder you are currently in.
There are a lot of commands you can use to do basically anything you are used to doing on your graphical user interface for browsing files (Finder in MacOS or File Explorer in Windows). If you want to find a command for something, just use a search engine to search “unix” and what you want to do and you will find documentation on how to do it. For example, I want to find out how to list all the files in a folder including hidden files, so I Googled “unix view all hidden files”.
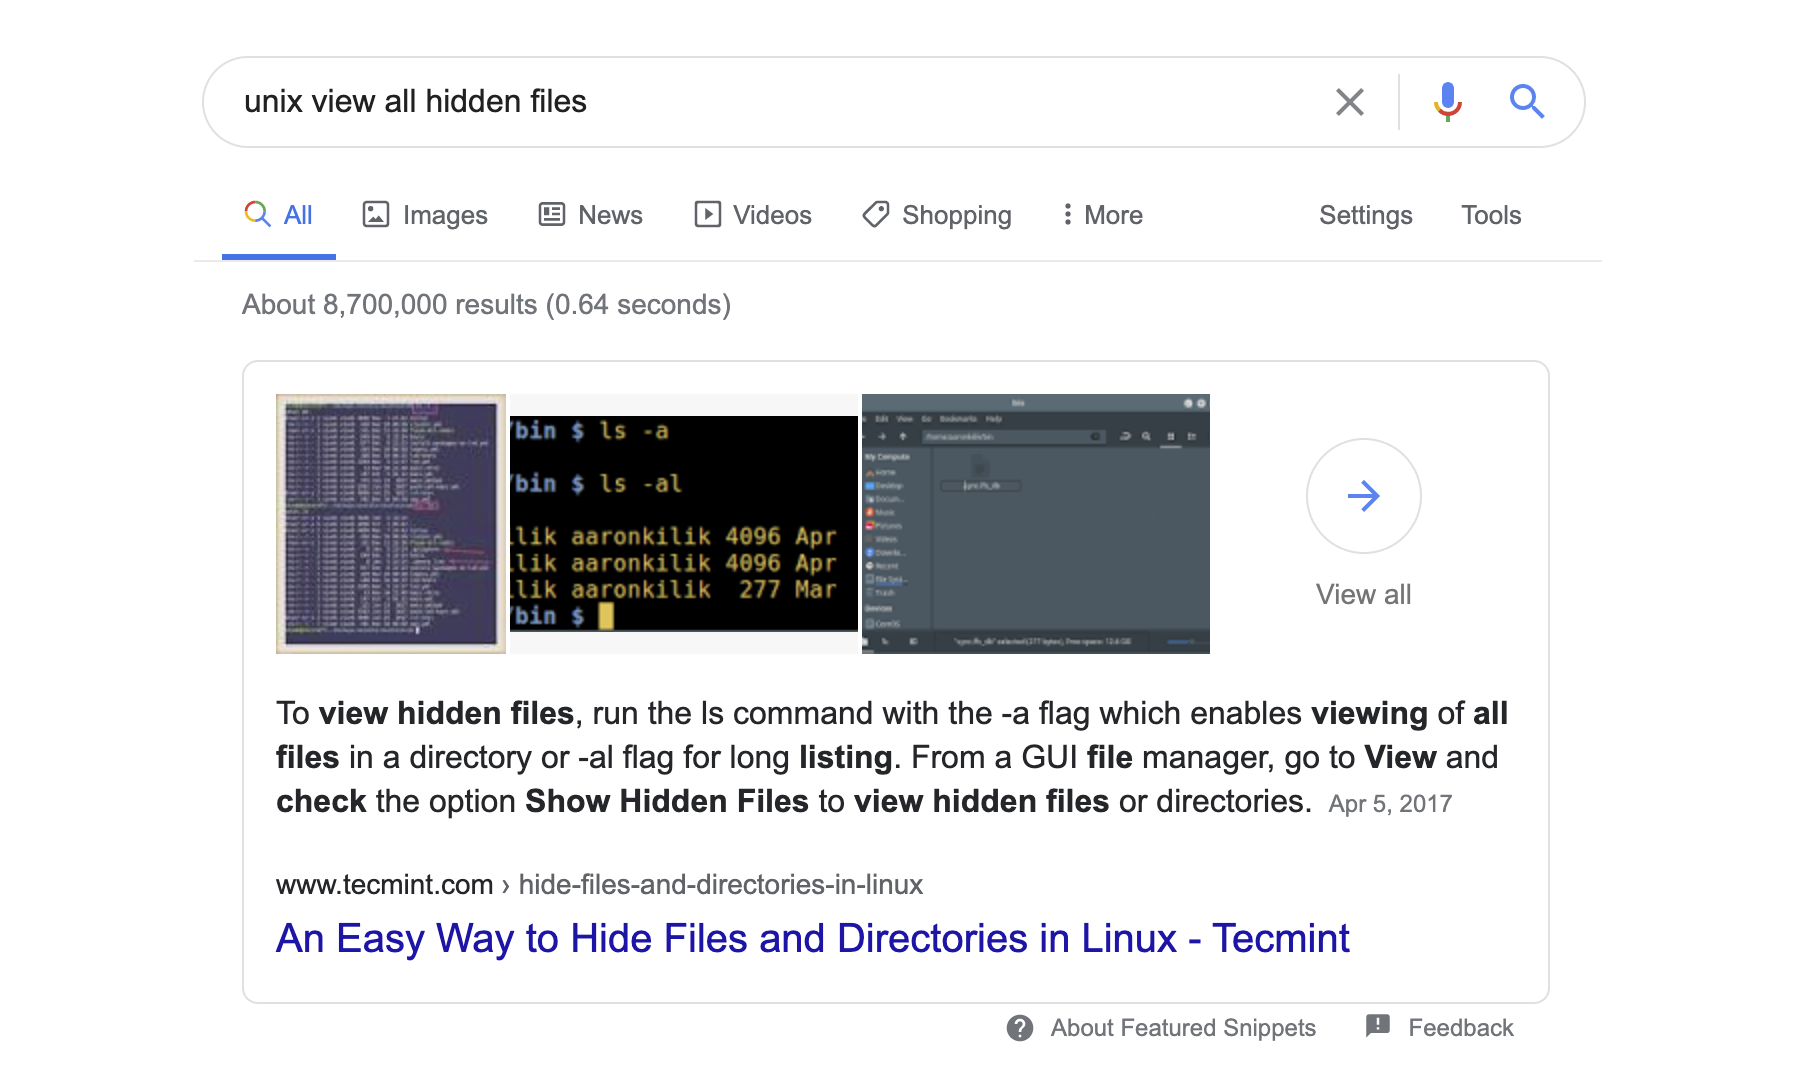
The first result gives me the answer, which is the command ls -a. There is a lot of documentation online as well as solutions to common issues on Stack Overflow or Ask Ubuntu. Be aware that while a lot of the commands are available on all UNIX operating systems, some commands are specific to Linux distributions and some are specific to macOS, so you may need to do more research if a command isn’t working on your terminal. One example is open on macOS and xdg-open on Linux.
Initiating the local git repository
So, now you are ready to create the folder where your website files are going to be saved. The name for the folder is based on 2 conventions. First, it’s easiest to make the name of the local folder that contains your git repository match the name of the remote repository on github.com. Second, the Github repository you are using to serve a Github Pages site must be named “yourgithubusername.github.io” where “yourgithubusername” is replaced with your github username.
For example, the name for our Github (organization) account is “virtualgoodsdealer”, so the repository for this site’s files on Github is named “virtualgoodsdealer.github.io”. Since I always match my local and remote repo names, I named my local folder “virtualgoodsdealer.github.io”.
Run the following commands to create the folder and move into it.
mkdir yourgithubusername.github.io
cd yourgithubusername.github.io
Then initiate a git repository in this folder:
git init
You should see an output like “Initialized empty Git repository in …”
Installing a code editor
So now we have our git repository initiated, but how do we start creating files to add to it? We need to install a code editor. A code editor is a program for editing files that contain code. You can think of it like Microsoft Word but for code. There are many code editors out there; some popular free ones are Microsoft VS Code, Atom, and Sublime Text. I use Sublime Text because it’s light and simple and works for the scope of projects I am doing. I would recommend it for this project if you are a beginner.
If you want to be a super nerd, I recommend learning how to use vim. It’s a command line editor that is already installed on most UNIX systems. I still like using this editor but I do not recommend using it if this is your first time using a code editor because of the amount of commands you have to remember. Personally, I hate Microsoft VS Code and Atom confuses me but you can choose whatever you are comfortable with. Everyone has their own preferences and in the end it doesn’t matter for this project as long as you are able to open and save files.
Creating a .gitignore file
Now, we need to create a .gitignore file. A .gitignore file is a file that contains a list of folders and files that you want git to ignore. Any file or folder that is listed will not be tracked as part of git’s version control system. The contents of this file really depends on the languages and frameworks you are using in your program. Mostly, it is used so that specific files that are generated by operating systems or frameworks are not uploaded to Github. For the barebones website we are creating in this part of the tutorial you only need to add content if you are using a Mac.
Run the following command in your terminal.
touch .gitignore
Then navigate to the folder that holds your local repo and open the .gitignore file in your code editor. If you are using a file browser program (Finder or File Explorer), you may need to enable viewing hidden files in the program settings to see the file.
Add the following text to the file. Then, save and close.
.DS_Store
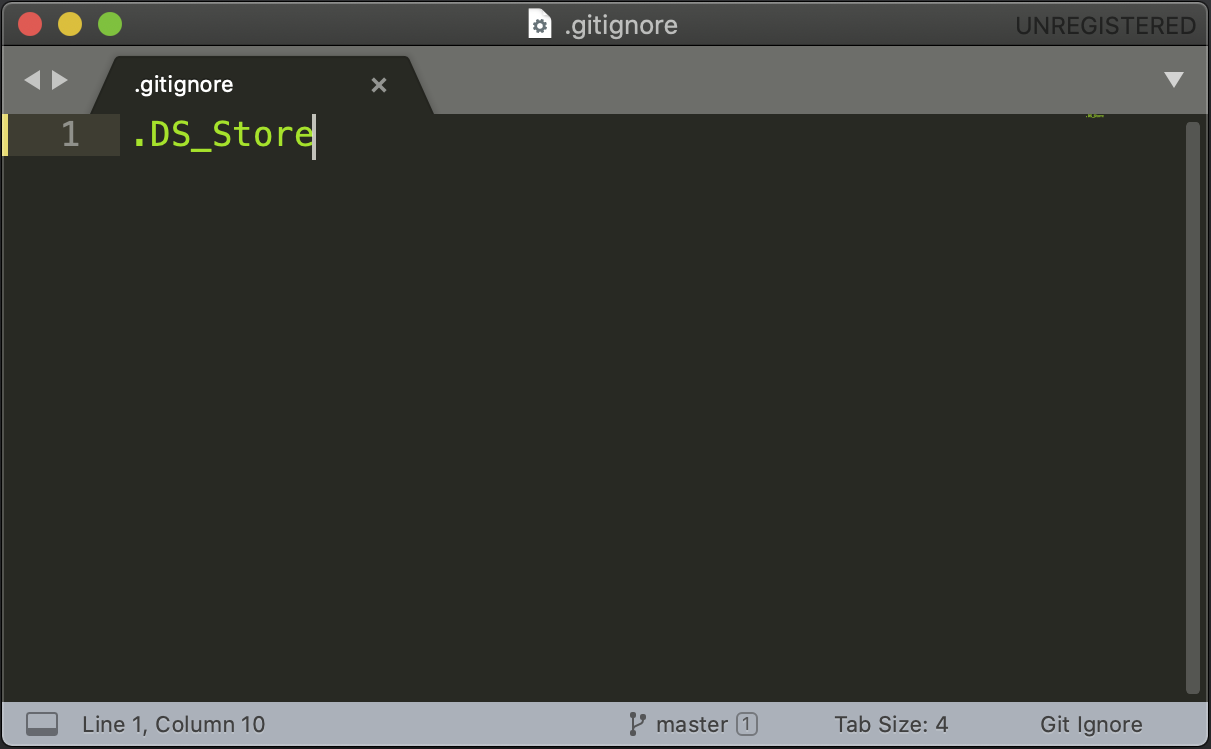
This is mainly to ignore a file that is generated on MacOS systems but it’s good to add it even if you aren’t using MacOS in case you work with someone that does on the repo. Here is a collection of .gitignore file templates for different programming languages and frameworks that you can use depending on your project.
Staging and commiting changes
Now we have our first new file, but we have to save this change to git. Use the git status command to see the status of your git repo.
The output should look something like the image below. Keep in mind your terminal window will look different from mine if you are using Ubuntu on Windows or a different terminal application.
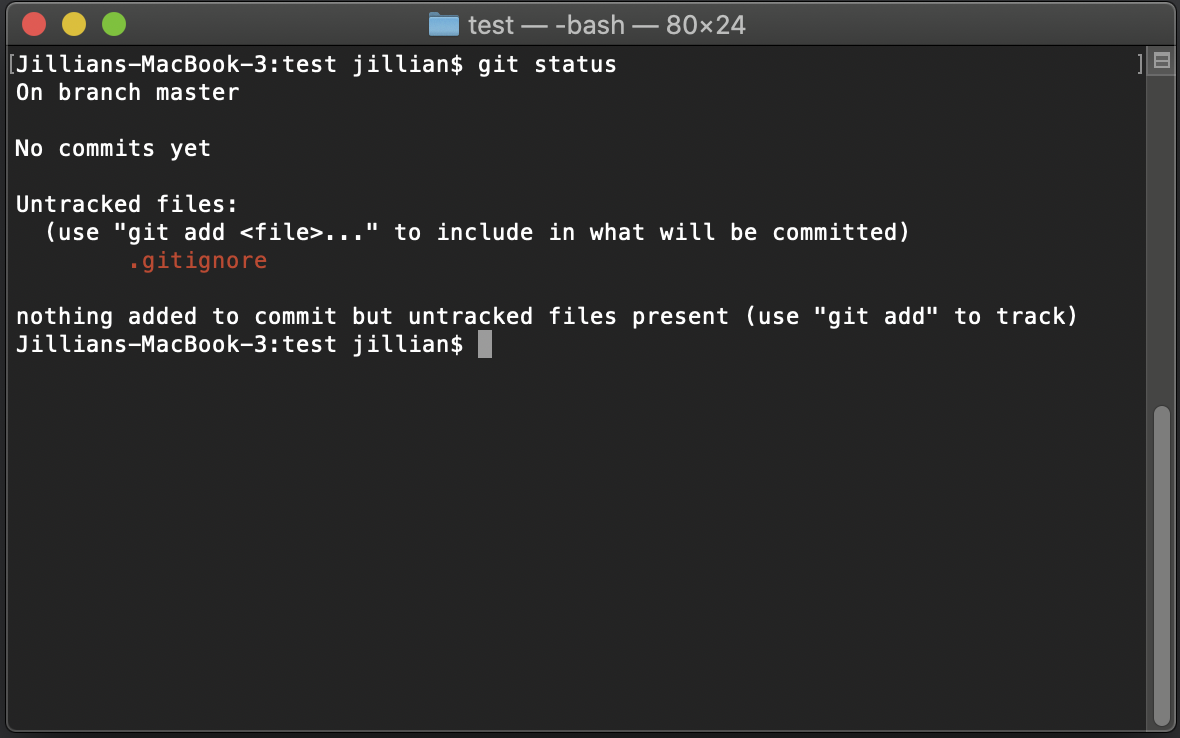
The output says there are no new changes you can currently save to git but there are changes in untracked files. This is because we created a new .gitignore file but that file is currently not being tracked by git.
Use the git add . command to add changes to all files in the current folder to the staging area. . means the current folder; however, you can add individual files to be staged with git add filename (replace filename with the name of the file).
Then, run git status again. All the changes that are in the staging area will be listed under the text “Changes to be committed”.

Now, you can see that the creation of the .gitignore file is staged. When a change is staged, it is marked as being ready to be saved. So, make sure you are only staging changes that you want to keep.
Now, we are going to commit our staged changes. After doing so, the staged changes will be included in an entire snapshot of the git repo. This snapshot, also referred to as a commit, is saved by git. Think of this as the equivalent of saving changes to a file. This is why you must only stage changes you want to commit. However, the whole purpose of using git is to add version control to your project, so you can always roll back to a past commit.
Run the following command to commit your staged changes.
git commit -m 'description of commit'
The -m flag means message. After it, write a detailed description of the commit within quotations so you can understand at a glance what changed in each commit.

You just made your first git commit! Since the .gitignore file was included in the lastest snapshot of your git repo, the file is now being tracked by git. From now on, when we are staging changes, git will ignore the folder referenced in the .gitignore file. Refer to this section or the quick git command reference at the bottom of this page if you need to make subsequent changes to your files.
Creating a repository on Github
We committed changes to our local git repo, but now we have to get those changes onto Github. In a web browser, go to github.com/new to create a new github repository.
Under “Repository name”, enter “yourgithubusername.github.io” where “yourgithubusername” is replaced with your github username. Keep everything else at the default settings. Then, click “Create Repository”.
Connecting the local repository to the Github repository
You should now be redirected to the web page for your new github repository. Follow the instructions under “…or push an existing repository from the command line” and run the following commands.
git remote add origin https://github.com/yourgithubusername/yourgithubusername.github.io.git (replace yourgithubusername with your github username)
git branch -M main
git push -u origin main
The output will prompt you to enter your Github username and password. Text characters will not appear on your screen when entering your password. Just type it and press enter. Note that this is your Github account username and password (what you use to login to github.com).
You should see an output message similar to this.

Now your local git repo is connected to your remote github repo. Your local commit was also pushed your remote repo. Refresh the web page for your Github repo and you should see your .gitignore file there. Congrats on pushing to github for the first time!
From now on, you can use the command git push origin main to push your local git commits to your remote github repo. Think of this as the equivalent of uploading a new version of a file to Google Drive.
There is so much more functionality to git and I only gave you the basic commands you need to get this working. If you are interested in learning more or need to look up how to do something, check the git documentation for a list of commands or read articles from the Pro Git Book. We briefly learned the concepts of commit, push, and remote. Some basic concepts you should eventually learn are clone, fetch, merge, pull, and branches.
Another thing you can set up is connecting to Github with SSH so you do not have to enter your Github username and password everytime you push to the remote repo.
A barebones website and resources to get started
We now know how to use git to save our work and upload it to Github. It’s time to actually build our website. From here, everyone’s process will start to differ. In this section, I will go over the basic files you need to have a web page, the programming languages used in front end web development, and some resources to continue developing your static website.
The next part of this tutorial is about using Jekyll to install readymade templates and adapting them for your use. So if you want a polished and scaleable site from day 1, stay tuned for the next part. However, I recommend you keep following along anyway so you understand the basics of frontend web development.
The three languages used to create web pages are HTML, CSS, and Javascript. HTML is a markup language used to display and layout the contents of the page (text, images, buttons, links). CSS is a stylesheet language used to style and position the contents of a page (colors, fonts, borders, fixed navigation bars). Javascript is a scripting language used to add interactivity to a page (notifications, responsive content).
Creating an HTML file
Every web page is an html page. The home page of a website is always named index.html. So when we serve our website, the content on the index.html page will be viewable at yourgithubusername.github.io.
Create a file named index.html in the folder of your git repo, open it in your code editor, and add the following code to it. You can replace “Mynamehere” with your name or whatever you want.
<!DOCTYPE html>
<html>
	<head>
		<title>Mynamehere</title>
	</head>
	<body>
		<div>
			<p>Welcome to mynamehere's web page. You can contact me here.</p>
		</div>
	</body>
</html>
The words that are surrounded by angled brackets are called tags. There are many tags and they all have different purposes. Most importantly, remember that if there is a starting tag, there must be an ending tag at the end of the content. For example, the <p> and </p> tags surrounding the 2 sentences are called paragraph tags and are usually used for a section of text.
The text within the <title> title tags is the title of the web page. You can see this text on the tab of a web page in your web browser. Open the index.html file we just created in a web browser to see.
Finally, the <div> tag is used to hold and separate content. We will be using it more in the next section.
Now, let’s create a link to our email address so people can contact us through our web page! The tag for a link is the <a> anchor tag. Use the following code to create a link to an email address.
<a href="mailto:myemailaddress@example.com">click here to email me</a>
The contents inbetween the quotation marks after the href attribute is the address that the web browser will go to when someone clicks the link. The text inbetween the two anchor tags becomes the clickable link. A link can go to an external web address or another html file (another page on your site). More about links here.
So now let’s add the link to our web page.
<!DOCTYPE html>
<html>
	<head>
		<title>Mynamehere</title>
	</head>
	<body>
		<div>
			<p>Welcome to mynamehere's web page. You can contact me <a href="mailto:myemailaddress@example.com">here</a>.</p>
		</div>
	</body>
</html>
Save the file. Then, open the file in your web browser again or refresh the page to test it. Note that everytime you make a change to your website files, you have to save them and refresh the browser to see the changes reflected.
Creating a CSS file
Now let’s create a CSS file and connect it to our HTML file. In the folder of your git repo, create a file called style.css with your code editor.
To connect the CSS file to our HTML file, we need to reference in the header of the HTML page. Add the following code within the <head> head tags. More about the head tag here.
<link rel="stylesheet" href="style.css">
Your index.html file should now look like this.
<!DOCTYPE html>
<html>
	<head>
		<title>Mynamehere</title>
		<link rel="stylesheet" href="style.css">
	</head>
	<body>
		<div>
			<p>Welcome to mynamehere's web page. You can contact me <a href="mailto:myemailaddress@example.com">here</a>.</p>
		</div>
	</body>
</html>
Open the style.css file. Let’s change the color of our text. Add the following to the style.css file.
p {
	color: #0000ff;
}
This will change the color of all text inside paragraph tags to a specific shade of blue. You can use this color picker to find the hex decimal code that represents different web colors. Open the index.html file in your web browser again or refresh the page to see the change.
Using class and id
Finally, I will teach you the basics of using class and id. In the last section, we styled our page by targeting all content surrounded by a paragraph tag. With class and id, we can target parts of a webpage or elements even more specifically. We can create a class or id, add styles to it, and then assign it to specific elements. Then, the styles will be applied to only those specific elements. For example, you could use this if you want two different paragraphs to be two different colors.
Classes and ids function in the same way, but they are used in different situations by convention. A class can be applied on several elements. An id can only be applied on one element. It must be unique. More about class and id here.
Let’s use a class to change the positioning of our text section. Add a class to the div element.
<!DOCTYPE html>
<html>
	<head>
		<title>Mynamehere</title>
	</head>
	<body>
		<div class="content">
			<p>Welcome to mynamehere's web page. You can contact me <a href="mailto:myemailaddress@example.com">here</a>.</p>
		</div>
	</body>
</html>
Now, we can add properties to that class by adding the following code to the style.css file.
.content {
	margin-top: 100px;
	margin-left: 50px;
	width: 80%;
	font-size: 2em;
}
Open the index.html file in your web browser again or refresh the page to see the changes. The margin properties created pixel width margins on the top and left sides of the div element that has the content class applied. The width property sets the width of the div to be 80% of the width of its parent element. Since the div’s parent element is body, the div will be 80% of the width of the web page. You can resize your browser window to see the div width change. The font size property sets the font to be 2 times the size of the default browser font size. More on em values here.
Resources for customizing your website
We only used a couple CSS properties on our extremely simple webpage, but there are a lot. This CSS reference from MDN web docs contains a list of every standard CSS property. It’s a good reference point for understanding the usage of specific CSS properties.
Don’t worry if you are overwhelmed by the amount of properties. People always tell me that they don’t know CSS and honestly I don’t know CSS either. If I want to find out how to do something, I usually just Google “css” and what I want to do. For example, try searching “css change font family” on a search engine to figure out how to change the font of the text on your site.
Speaking of fonts, a good resource for fonts for your website is Google Fonts. There are a lot of free fonts you can easily reference and apply to your site.
Like I mentioned earlier, you can use Google color picker to choose web colors and find the hex decimal codes for them.
Hopefully that is enough to get you interested in customizing your web page. As your site becomes more complicated, you may not want to style every element manually yourself. That’s where frameworks come in. By referencing libraries of code written by others, we can easily apply their styles and layouts. A popular framework is Bootstrap. This site uses Bootstrap to create a responsive layout or a layout that can change based on the size of the window. This is important because your site needs to look good on different screen sizes and devices. If you decide to use the Jekyll theme I’m writing for the next part of this tutorial, you will be using Bootstrap.
Lastly, I recommend getting comfortable with using Chrome DevTools to test and troubleshoot your web page. Have you ever right clicked while using Chrome and clicked “Inspect”? This opens the DevTools window where you can edit elements on your page and see the changes live without actually editing your files.
Resources for learning frontend web development
I can’t go into details about HTML and CSS (not to mention Javascript) in this tutorial because it would be way too long. Also, there are so many more professional and knowledgable tutorials out there available for free.
MDN web docs has a complete web development course that covers HTML, CSS, Javascript, and even backend web programming. Honestly, I should have linked their courses on our site and called it a day.
Zines by Jackie has a aesthetically pleasing and beginner friendly tutorial on using HTML and CSS to create a simple site. The end product of the tutorial is basically what we just did with our HTML and CSS files but the tutorial goes into more detail on tags and properties. It’s also a fun read on early web design.
If you know more resources on learning web development or wrote one yourself and think I should add it here, please share a response in the form below this article.
Serving your Github Pages site
Now that we wrote a basic site, it’s time to upload it to Github and serve our site. We need to add our two new files to our git repo, commit the changes, and push those changes to our remote repo on Github. To do this, we just have to do the same steps we did with the .gitignore file.
Pushing changes
Open your terminal and go inside the folder that your website files are saved in, yourgithubusername.github.io, and run the following commands.
git status to see the status of your repo.
git add . to stage changes to all files in the folder.
git commit -m 'created index.html file and style.css file' to commit the changes.
git push origin main to push your commit to Github.
Now if you go to your repository on Github at github.com/yourgithubusername/yourgithubusername.github.io, you should see index.html and style.css in the repo.
If you make further changes at anytime, repeat the above steps. You can also refer to the quick reference below for commonly used git commands.
Quick Git Command Reference
git init - create a new git repository
git status - view changes to git repo and staging area
git add filename where “filename” is the name of a file or folder - stage changes to file to be committed
git commit -m "description of commit" - commit staged changes
git push origin main - push local commits to remote Github repo’s main branch
Setting up Github Pages
Nice! We are so close! Now all we have to do is tell Github we want this repository to be hosted on Github Pages. From the repository page, click on “Settings” at the top right of the page or go to github.com/yourgithubusername/yourgithubusername.github.io/settings.
Scroll down to the “Github Pages” section.
Under “Source”, click on the drop down that currently says “None”.
Select the “main” and then click “Save”.
Now, refresh the page and scroll back down to the “Github Pages” section. It should now say that your site is published. You can check the box next to “Enforce HTTPS”.
Your site is now live at yourgithubusername.github.io and can be visited by anyone at that address! Github Pages is using the files in your remote repo to generate this site. From now on, everytime you push changes to Github, they will automatically be reflected on your live site. That’s why it is important to test locally by opening your HTML files in your web browser before pushing changes to Github.
Using a custom domain
You can use a custom domain with Github Pages. This is so that your Github Pages site address will be a domain you own and not yourgithubusername.github.io. For example, we have a custom domain set up on this site so the address is “pages.virtualgoodsdealer.com” instead of “virtualgoodsdealer.github.io”. To do this, you need to purchase a domain name if you don’t own one. The Github docs has a guide to setting up a custom domain name with Github Pages.
What is coming in part three?
As mentioned before, the next part of this tutorial will be about using Jekyll themes with Github Pages. I chose to cover this because I think it’s a fast way to build a polished and scalable site for yourself. Like I talked about in part one, my goal for this tutorial series is to have people build sites they want to use. The site we built in this tutorial only has one page, but what if you wanted to write a blog (similar to this one) and need a page for each article and you have 50 articles? And what if you want to add new articles every day? Also, if you aren’t someone that wants to bother customizing every little detail on your site but you still want it to look nice, using themes made by others is a good idea. And if you are someone that loves customizing the appearance of things, you have the option to edit an existing theme to your preferences.
I’m also going to be creating a Jekyll theme for the next part of the tutorial aimed at Instagram users for displaying content they originally created for Instagram. So, stay tuned for the next part and feel free to contact me via the form below if you have feedback or questions on the tutorial. I’m always interested in improving it to be clearer for beginners.